Hood Supports Complete

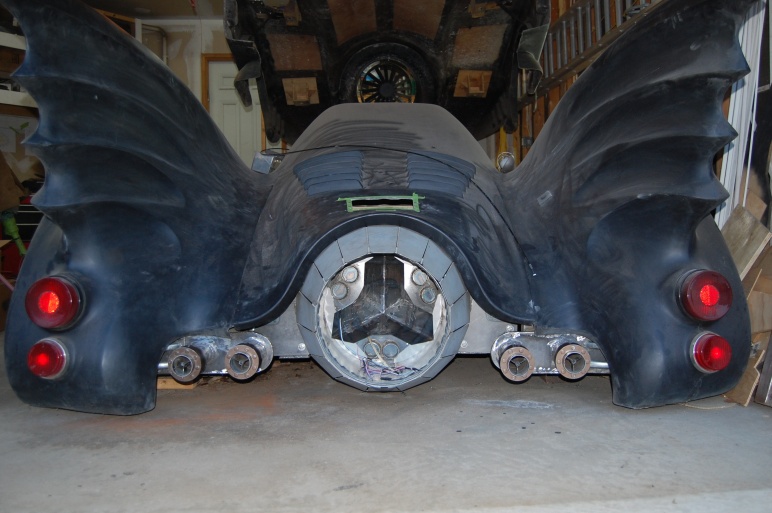
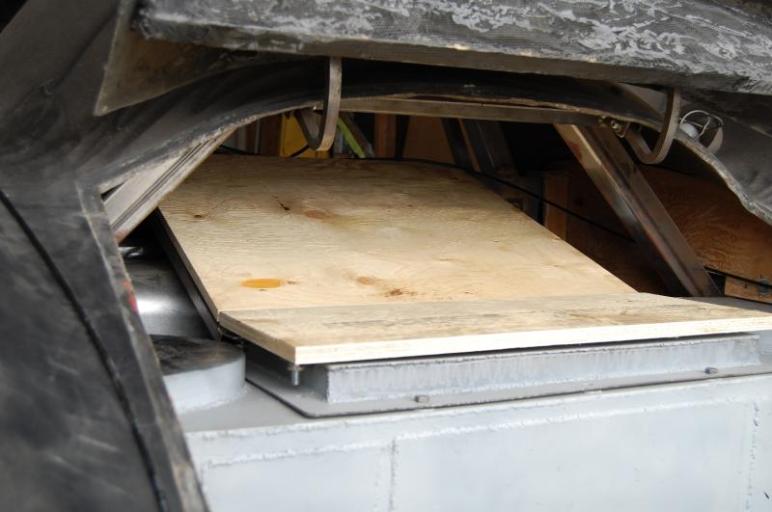
Another item that I knocked off my to-do list this past weekend was creating some adjustable hood supports.  The concept behind these are very similar to the feet you find on the bottom of your fridge or stove.

In order to get the section where the hood meets the cabin body to line up perfectly you need to fiddle around with height of where the hood rests.  The best way to do this is with some adjustable supports.  The hood on your average car also has this same concept where they are typically threaded rubber stoppers on both sides of your rad support.  All the little things that allow you to dial-in the gaps on a car.

Continue reading Hood Supports Complete

Electronics Rack Finished

Most of this weekend was spent either doing yard work or hanging out with my daughter at some local skateparks.  I did however accomplish both of my goals of finally being able to land a double peg stall on my BMX and knock off a few items on the BatBerry To-Do list 🙂

One of those to-do items was finishing off the electronics rack in the rear hatch area which will hold my amps and all other electronics for the car (sound boards, arduino, etc).  I had previously cut the wood that would serve as the mounting surface, but now I needed to make it all fasten together.

Continue reading Electronics Rack Finished

Exhaust Tip Mounts Part 2

After a partial success on my exhaust tips yesterday, I started back to work after lunch today where I left off.  With a little more investigation I realized that the steel that I used actually wasn’t too thin.  There was some space behind the one 2×2 tubes allowing for front-to-back play.

I solved that problem by welding on a 1/8″ plate to the back of the 2×2 tube so that there wasn’t any wiggle room left.  I also found that I needed a third anchor support.  For this I welded on another tube just below the top support (seen in the picture below).  This gave more vertical support and allows the mount to slide right into place and then the bolts simply secure everything so that nothing moves.

Continue reading Exhaust Tip Mounts Part 2

Exhaust Tip Mounts Part 1

I’ve been pondering how in the world I wanted to mount my big chunky/heavy exhaust tips for a while now, so yesterday I figured I would see what I might be able to figure out.  In order to make sure everything was going to sit where I wanted, I first had some trimming of the body to do.

There were a couple of flanges around the bottom rear corners of the body that I believe are just there from being pulled from the molds.  When I looked at a lot of up-close photos of the actual car these flanges were not present.  In order to make sure that I get the look I want these flanges had to go.  I marked off the areas that needed to be trimmed with some masking tape and then used the Dremel cut-off wheel to slice it all off.  As you can see my newly created jack points came in handy to raise the rear of the car for this work 🙂

Continue reading Exhaust Tip Mounts Part 1

Creating some Jack Points

One of the things you quickly discover when building this car is how it’s incredibly low to the ground.  Yes, you can use the air suspension to raise it up for getting over things like steep inclines and speed bumps, but what gets you in a pickle when you want to get a jack under the car is that the body wraps down around the outside of the frame.

This leaves you basically no area where you can get a jack under the car.  Even when you raise it with the air suspension the overlap of the body hits the arm of the jack before the face of the jack hits the frame. This is more so a problem with the rear of the car as there are “some” points near the front that are easier to get to with a jack.

Continue reading Creating some Jack Points

Electronics Rack Progress

I was able to make some more progress on the electronics rack yesterday.  Previously I had fabricated the mounting points and bars for the rack, but now I’m starting to turn my attention to the surface material.  Turns out the width of the area needed was almost a perfect 24″.

That allowed me to simply go and pick up a pre-cut 2’x4′ hobby board from the local store. I chose to use plywood as the backing surface instead of MDF because I’ll end up adding and removing components multiple times.  Plywood is just friendlier for wood screws than MDF which will sometimes just chew away the material and you end up having to use wood filler.

Continue reading Electronics Rack Progress

First Attempt at the Trunk Latch

Saturday I made my first attempt at making the trunk latch mechanism work.  It all started with creating a solid mounting surface out of metal.  I marked/drilled the holes on the metal and then welded some nuts onto the back.  I also traced the pattern onto some 1/2″ plywood that will serve as the core material for attaching the latch to the trunk lid.

I also used a chisel to recess the area under the metal so that the steel would sit flush with the surface of the plywood.

Continue reading First Attempt at the Trunk Latch

Cutting a Hole in the Trunk

Today was the first day of my extra long holiday weekend. Of course it didn’t start off that great when I dropped the truck off for an oil change and found out that my radiator had a hole in it.  I always hate spending money on crappy things, I’d much rather spend them on fun things 😦

I did manage to get out to the garage after lunch and started working on the trunk.  First I had to make sure that the bar holding the trunk hinges was properly welded to the chassis.  Currently it’s just bolted onto the body of the car temporarily.  Before I started doing any kind of latching mechanism alignment I needed to know that nothing was going to move.

Continue reading Cutting a Hole in the Trunk

A Tour of the BatCave

I’ve had a few different people ask me about where I build the BatBerry.  A lot of people think that I have a separate facility where I work on the car.  Truth is, I work on it right in my attached standard two car garage.  To dispel the myths and rumors I figured I would post of some footage of what it’s like inside the BatCave 🙂